How to Fix WordPress If an Update Broke Your Site
The WordPress update broke your site, leaving you with a blank screen instead of your homepage. Now, your site is down, and visitors are facing error messages instead of your content.
This is, in fact, a very common scenario for WordPress website owners. But don’t worry just yet, as we’re here to help.
In this guide, we’ll show you how to fix your WordPress site after an update issue. We’ll walk you through identifying the problem and provide step-by-step instructions on how to restore your site.
We don’t want to further prolong your broken site so let’s get started!
Understanding the Problem
First, you need to figure out what’s wrong with your website. When WordPress updates its core software, it can sometimes cause issues with compatibility, leading to problems on your site. Here’s why this happens:
Themes and Plugins
When you update WordPress or PHP, problems can arise if your themes and plugins are outdated. These themes and plugins are often designed to work with specific versions of WordPress and PHP only.
During a major update, new features may be added, or old ones removed, causing compatibility issues. As a result, outdated themes and plugins might not function properly with the new code, leading to errors or even site crashes.
Database Conflicts
Sometimes, when WordPress updates, it changes how the database is structured, which is how your site stores data. If your plugins or custom code are set up to work with the old structure, they might not work properly after the update.
This can lead to problems like data not showing up correctly or errors when trying to get information from the database.
Server Configuration Mismatches
When updating WordPress, you need to make sure your server is set up correctly. WordPress suggests using the latest PHP versions for the best performance and security. If your server is running an older version of PHP, you can run into problems because it may not work well with the new WordPress updates.
Also, some hosting setups have specific settings, like memory limits or how long a process can run. These settings might not match what the updated WordPress or its plugins need, which could cause errors and even take your site offline.
In reality, memory limits in WordPress are often the culprit after an update breaks a site.
Identifying the Scope of the Problem
Next, we need to figure out how big the problem is. If your entire website is down, that’s usually a sign of a serious issue, like a major compatibility problem, a plugin conflict, or even something wrong with your hosting.
On the other hand, it’s probably a smaller issue if only certain parts of your site aren’t working.
It’s also important to know whether the issue is with the front end (what visitors see) or the back end (your admin area). If the site looks strange or elements are missing, it’s likely a front-end issue related to your theme, CSS, or JavaScript.
If you can’t log in to the WordPress dashboard, see error messages, or can’t update content, the problem is possibly on the back end of your site.
Pre-Troubleshooting Steps
Before jumping into the technical steps to fix your WordPress website, there are a few important things you need to do:
1. Backup Your Site
This step is often ignored but is very important, especially if a WordPress update broke your site.
Backing up means saving a copy of everything on your site. To make sure you have a complete backup, it’s best to include all key parts of it. This includes the files that create your site’s structure and appearance, like HTML, CSS, JavaScript, and images.
Don’t forget about your databases. They store important data like user info and settings. Also, remember to back up your media files like images and videos, as they are part of your content and user experience.
The reason for doing a website backup is simple: prevention is better than cure. If an update to WordPress breaks your site, having a backup allows you to quickly recover and avoid major problems like file loss, server crashes, or malware attacks.
How to Backup Your Website in cPanel
If you’re using GreenGeeks as your website host, you can back up your website via cPanel by following the steps below.
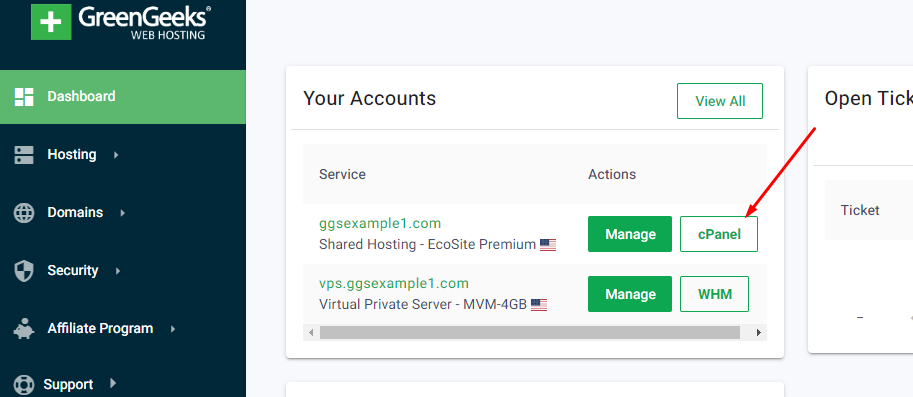
First, log in to your GreenGeeks account and click on the cPanel button beside your account of choice.

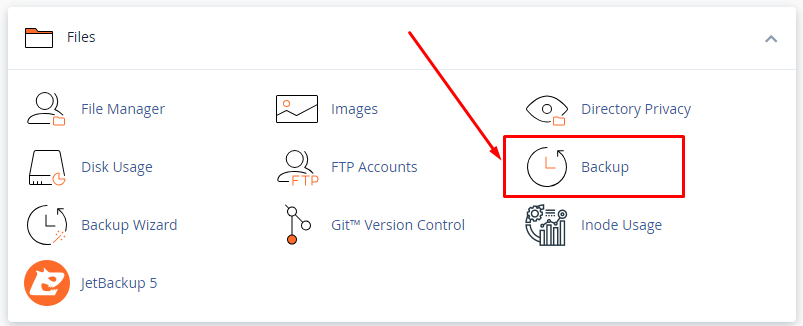
Next, under the Tools section, click on the Backup button.

Now, you can choose between having a full backup or a partial backup.
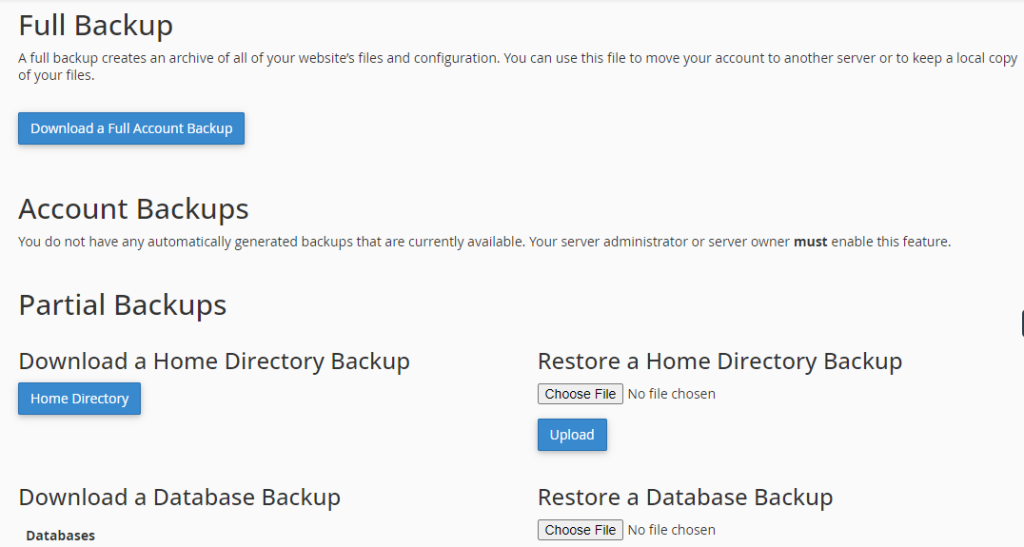

Backups created in cPanel and stored in your home directory will be automatically removed after 48 hours. To avoid losing your data, download the backup to your local computer right after generating it.
It’s also important to take note that cPanel backup is only applicable for accounts that are less than 10 GB in size. For larger accounts exceeding 10 GB, please refer to the backup instructions provided in this tutorial.
2. Enable Debugging Mode
Debugging in WordPress is the process of identifying and fixing errors or issues within your website.
You can enable debug mode in WordPress either manually or by using a plugin. Here’s a simple step-by-step guide for both methods:
Method 1: Using a Plugin
- In your WordPress dashboard, navigate to Plugins > Add New.
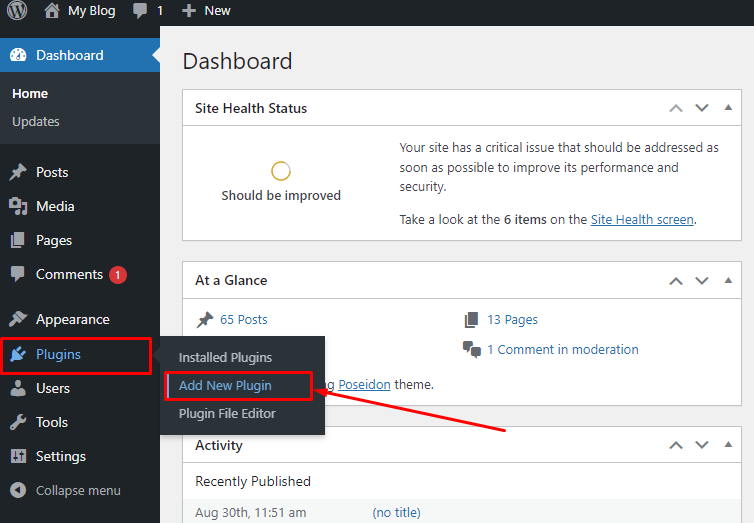

- Type the “debug” keyword on the search bar to look for plugin options. Or if you have a specific plugin to use, you type the name of the plugin directly. In the example below, we will try the WP Debugging plugin.
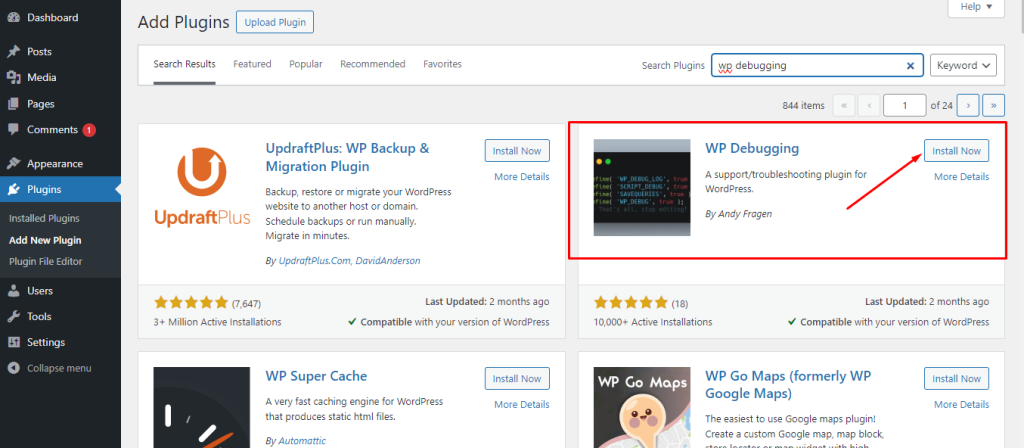

- Click the Install Now button, then activate the plugin.
- Go to Dashboard > Tools > WP Debugging, and check the box next to “Set WP_DEBUG to true”. Then, click Save Changes.
Method 2: Manual Method
- Before making any changes, create a backup of your site to avoid losing data.
- Use an FTP client like FileZilla, or your hosting provider’s file manager, to locate the wp-config.php file in your website’s public_html folder.
- Download the file and open it with a text editor (e.g., Notepad++). Add the following lines just before the line that says “/* That’s all, stop editing! Happy blogging. */”:


- Save the changes and upload the modified file back to your server.
With debug mode enabled, WordPress will log all errors into a debug.log file, which you can find in the wp-content folder. You can then review this log to troubleshoot the issues.
Remember: After you’re done debugging, it’s crucial to disable debug mode to prevent exposing error messages to your site visitors. You can do this by changing true to false in the wp-config.php file or by deactivating the WP Debugging plugin.
Common Issues and How to Fix Them
Here are the most common problems that happen when a WordPress update breaks your site:
White Screen of Death (WSOD)
The White Screen of Death (WSOD) in WordPress is a frustrating issue where your website only displays a blank white screen, making both the front end and the back end of your site inaccessible.
This often happens after a WordPress update broke the site or when there’s an issue during WordPress website repair.
Common Causes of WSOD
- Plugin or Theme Conflicts: A poorly coded plugin or an incompatible theme can cause WSOD, especially after an update.
- Memory Limit Exhaustion: If a script or plugin uses too much memory, it can cause the site to crash and show a white screen.
- PHP Errors: Syntax errors in your PHP files can lead to WSOD.
- Failed Updates: Sometimes, if a WordPress update is interrupted or fails, it can result in WSOD.
Step-by-Step Troubleshooting Guide for WSOD
Fix 1: Enable Debug Mode
This is the same procedure we mentioned previously.
Fix 2: Increase Memory Limit
Still, in the wp-config.php file, add the following line to increase the PHP memory limit:
define('WP_MEMORY_LIMIT', '64M');
If 64M isn’t enough, you can increase it to 128M or 256M, depending on your hosting plan.
Fix 3: Disable All Plugins
On the left side of your WordPress admin, click on Plugins > Installed Plugins. Click the Deactivate dropdown menu, check the topmost box for plugins, and click the Apply button.
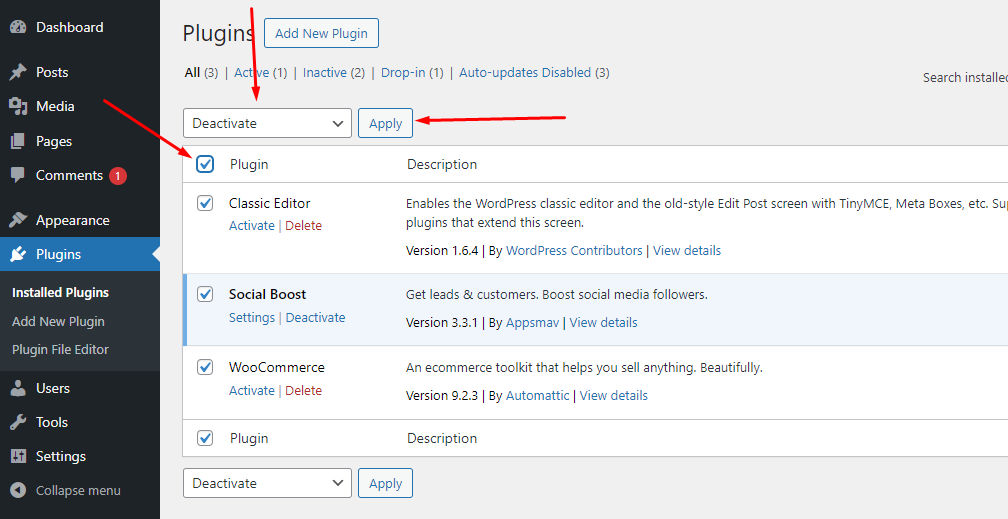

If your site comes back online, one of your plugins is the issue. Reactivate them one by one in the same admin interface until you find the culprit.
Fix 4: Switch to a Default Theme
On the left side of your WordPress admin, go to Appearance > Themes.
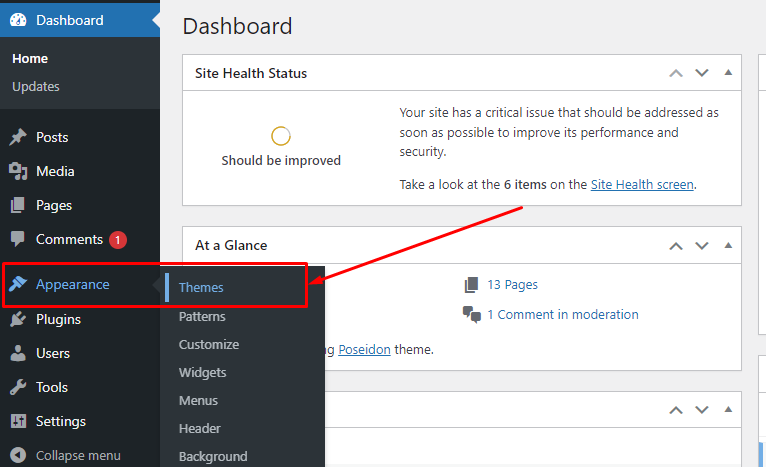

You’ll find the Twenty Twenty-Four default WordPress theme. Click the Activate button.
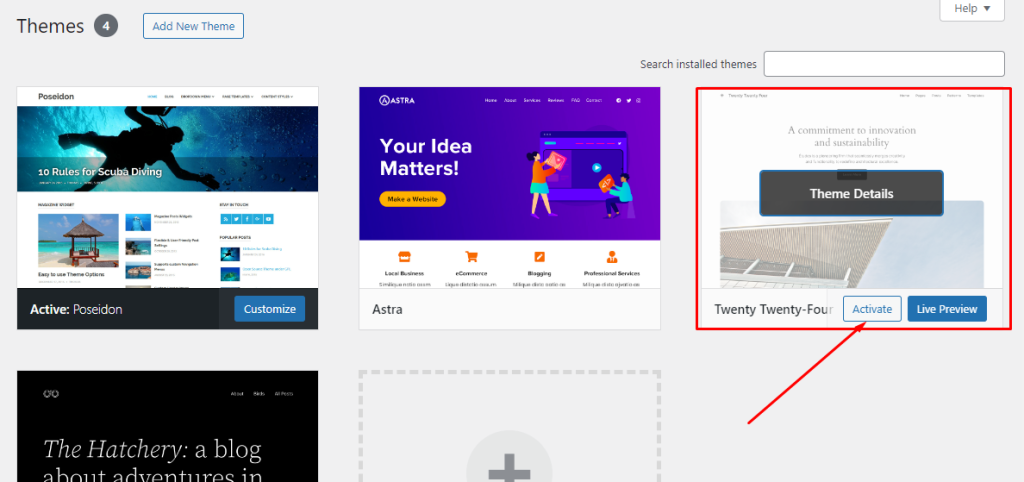

If this resolves the issue, then your theme is likely the problem.
Fix 5: Clear WordPress Cache
If you have access to the backend, clear your site’s cache. Sometimes, a caching issue can cause the WSOD even when the problem has already been fixed.
Fix 6: Check for Failed Auto-Update Issues
Look for a .maintenance file in the root directory via FTP and delete it. This file can sometimes cause the site to remain in maintenance mode, leading to WSOD
Getting Stuck on Maintainance Mode
If your WordPress is not updating and is stuck in maintenance mode, you can easily fix it using your hosting’s cPanel. When WordPress runs updates, it automatically creates a hidden .maintenance file in the root folder of your website.
Here’s a simple guide on how to fix it:
- Log in to your cPanel
- Look for the “File Manager” option in cPanel, which allows you to browse the files on your server.
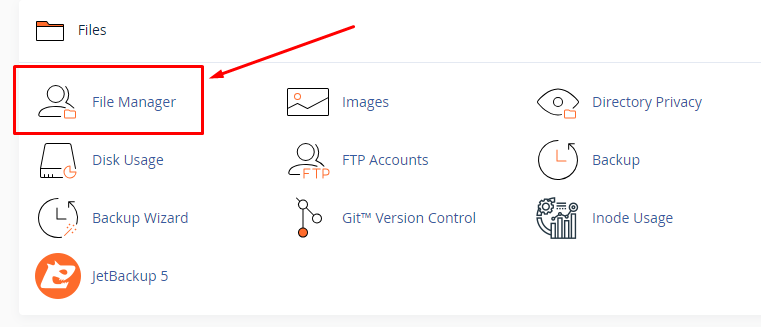

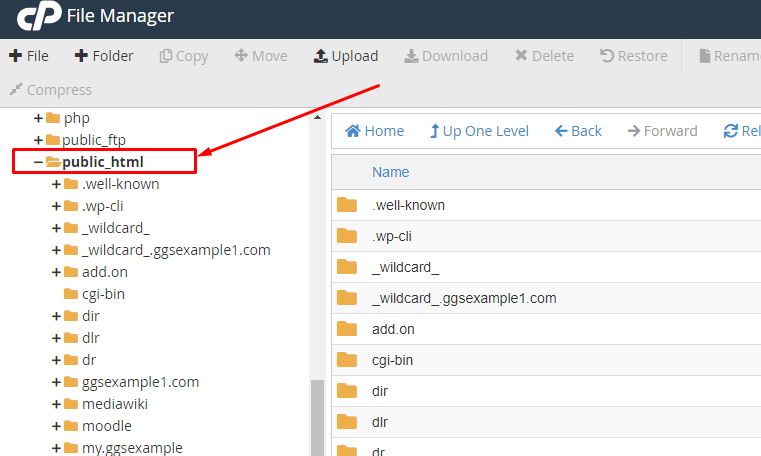
- Navigate to the Root Directory and find and open the public_html folder, which contains all the core WordPress files.

- In the File Manager, click on the settings or preferences and enable “Show Hidden Files” to reveal the .maintenance file.
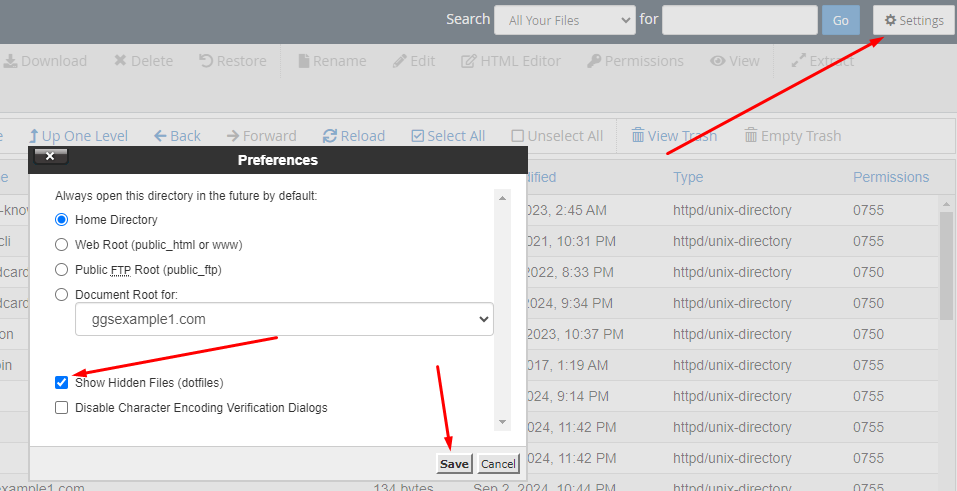

- Delete the .maintenance file if there is any. This file is what’s keeping your site in maintenance mode.
- Once you’ve deleted the file, refresh your website. It should now be out of maintenance mode and functioning normally.
500 Internal Server Error
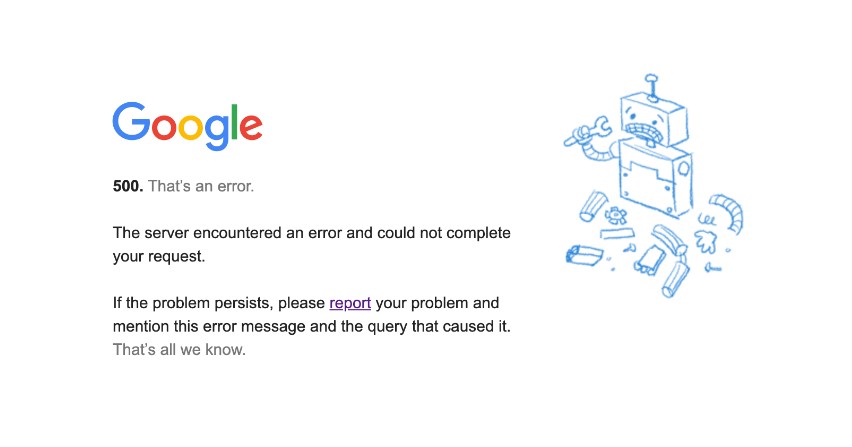

A 500 Internal Server Error in WordPress is a general error that indicates something has gone wrong on the server, but the server isn’t sure what.
Common Causes and Symptoms
- Corrupted .htaccess File: The .htaccess file controls how URLs are managed on your site. If this file becomes corrupted, it can lead to a 500 error.
- Exceeding PHP Memory Limit: WordPress scripts need a certain amount of memory to run. If they exceed the allocated memory, it can trigger this error.
- Plugin or Theme Conflicts: An incompatible or poorly coded plugin or theme can cause the server to crash, leading to a 500 error.
- Server Issues: Sometimes, the problem lies with your hosting provider’s server configuration.
Guide to Fixing a 500 Internal Server Error
I. Check the .htaccess File:
- Access your site via an FTP client or your hosting control panel’s file manager.
- Locate the .htaccess file in your website’s root directory.
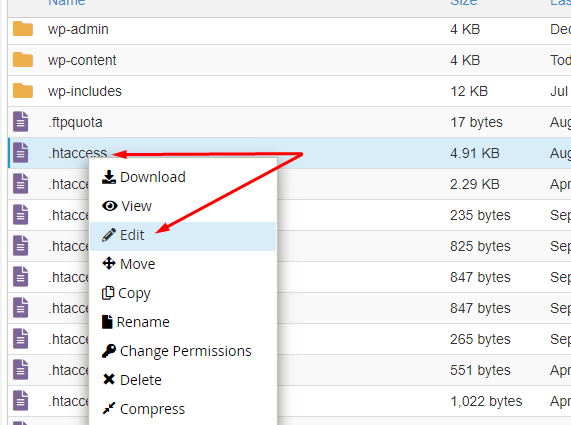

- Rename the file to something like .htaccess_old to disable it temporarily.
- Go to your WordPress dashboard, navigate to Settings > Permalinks, and click Save Changes without altering anything. This action regenerates a fresh .htaccess file.
- Check your website to see if the error is resolved. If so, the .htaccess file was the issue.
II. Increase PHP Memory Limit
Do the same process we mentioned last time. Open the wp-config.php file in your site’s root directory and add the following line of code before the “That’s all, stop editing!” line:
define('WP_MEMORY_LIMIT', '128M');
If this doesn’t solve the issue, try increasing the limit further or contact your hosting provider to assist with increasing the memory limit.
III. Deactivate All Plugins
(Do the same process as mentioned previously.)
IV. Switch to a Default Theme
(Do the same process as mentioned previously.)
V. Check Server Logs
Access your server logs through your hosting control panel or FTP. Look for error logs that can provide more details about what’s causing the issue.
VI. Contact Your Hosting Provider
If none of the above steps work, the issue might be server-related. Contact your hosting provider for assistance. They can check if the problem is due to a server configuration or resource limitation.
Error Establishing Database Connection
Common Causes
- Incorrect Database Credentials: If the database name, username, password, or host information is incorrect in the wp-config.php file, WordPress cannot connect to the database.
- Corrupt Database: Over time, the database can become corrupted, leading to connection errors.
- Server Issues: Sometimes, the server hosting your database might be down, or there may be a problem with your hosting environment.
How to Verify Database Credentials
1. Access the wp-config.php File
Look for the lines that contain DB_NAME, DB_USER, DB_PASSWORD, and DB_HOST. These lines store the name, username, password, and host of your database.
2. Check for Accuracy
Double-check that the values entered here match the credentials provided by your hosting provider. Even a small mistake like an extra space or a wrong character can prevent the connection.
3. Test the Connection
You can create a simple PHP file (e.g., testconnection.php) with the following code to test the connection:
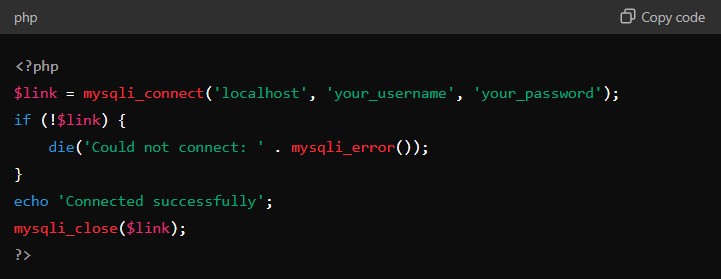

Upload this file to your server and access it via your browser (e.g., yoursite.com/testconnection.php). If it says “Connected successfully,” your credentials are correct. If not, you will need to update your credentials.
Step-by-Step Guide to Repairing the Database
1. Enable Database Repair Mode
Add the following line to your wp-config.php file, just before the “That’s all, stop editing!” line:
define('WP_ALLOW_REPAIR', true);
Save the file and navigate to yoursite.com/wp-admin/maint/repair.php in your browser.
2. Repair the Database
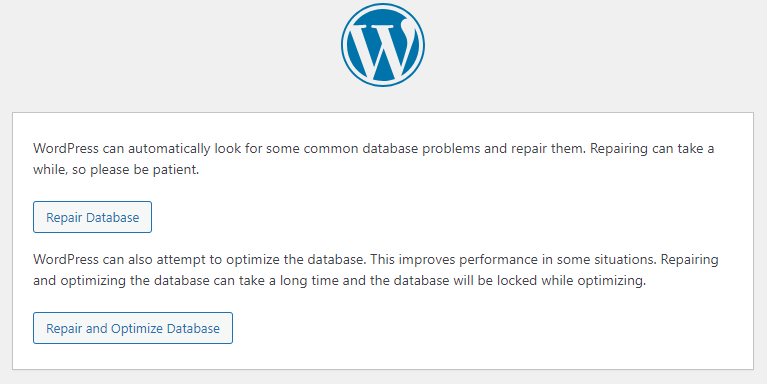

On the repair page, you will see two options: “Repair Database” and “Repair and Optimize Database.” Start with “Repair Database.” This option will attempt to fix any issues in your database tables.
After the process is complete, try accessing your site again.
3. Remove Repair Mode
Once the repair is complete, go back to your wp-config.php file and remove the line you added earlier to disable the repair mode.
PHP Errors or Compatibility Issues
Step-by-Step Method to Fix PHP Errors or Compatibility Issues
- Update Themes and Plugins: Ensure that all your themes and plugins are updated to their latest versions. Developers often release updates to fix compatibility issues with new WordPress or PHP versions.
- Use a PHP Compatibility Checker Plugin: Install and run a plugin like the PHP Compatibility Checker to scan your site for compatibility issues. This plugin will identify problematic code in your themes and plugins and provide suggestions for fixes.

- Revert to a Previous PHP Version (If Necessary): If the issues are too extensive to fix immediately, consider reverting to an earlier PHP version that your site was compatible with. This should be a temporary solution while you work on resolving the compatibility issues.
CSS or Design Breakage
CSS or design breakages in WordPress typically occur when an update disrupts how your site’s stylesheets or design elements are applied.
This can lead to your website appearing broken or not displaying correctly, with issues such as missing layouts, improperly aligned elements, or even complete layout collapse.
These problems often arise after a WordPress update when the updated core files are no longer fully compatible with your current theme or plugins.
Symptoms of Design Breakage
- Misaligned Layouts: Sections of your website may appear out of place or not aligned correctly.
- Missing Styles: Your site might look plain or unstyled because CSS is not loading or is loading incorrectly.
- Broken Navigation: Menus or navigation bars may not appear correctly or could be completely unresponsive.
- Invisible Elements: Some parts of your site may not appear correctly due to broken CSS rules, or certain features may fail if JavaScript, which depends on the correct application of styles, is not functioning properly.
Step-by-Step Method to Fix Design Breakage
1. Clear Browser Cache
Your browser might be showing an old version of your site’s CSS, causing the design issues.
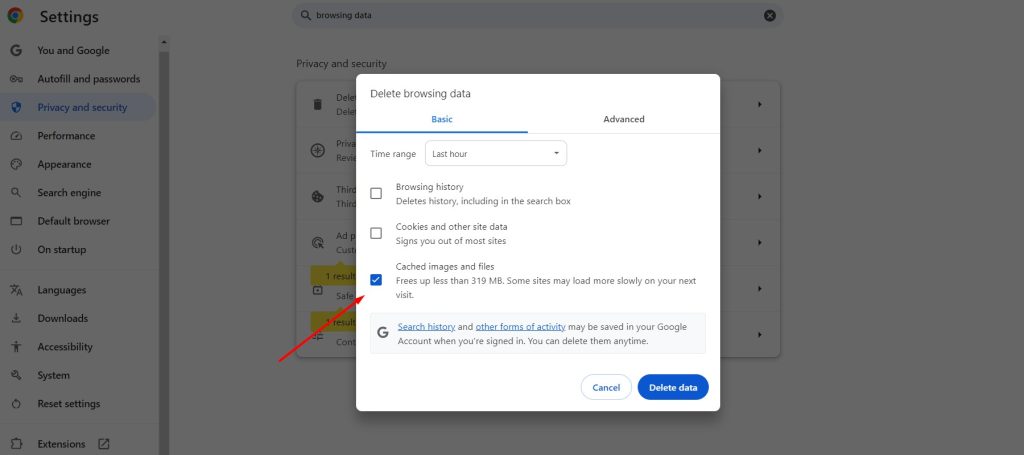
To solve this, open your browser settings, find the option to clear browsing data, and ensure you clear cached images and files. Reload your site to see if the issue is resolved.

2. Clear Server and CDN Cache
Your server or CDN might be serving cached versions of your site, which could include outdated or broken CSS.
- For server cache: Log into your hosting account, access your site’s control panel, and find the option to clear the server cache.
- For CDN cache: If you use a CDN like Cloudflare, log in to your CDN account, navigate to the caching section, and clear all cached files or specific pages as needed.
3. Check Plugins and Theme
Deactivate all your plugins and see if the issue is still present. When it comes to your theme, change to a WordPress default theme first to determine if it’s causing the problem.
Advanced Troubleshooting
If the earlier fixes didn’t work, it might be time to try some advanced troubleshooting.
Restoring Your Website Manually
Automated restore tools sometimes don’t work as expected, especially if the issue is complex. If this is the case, you might need to manually restore your site from a backup.
A manual restore can also help you replace only the corrupted files without overwriting everything. It saves you all the hassle.
Step-by-Step Method to Manually Restore WordPress Files and Database
Step 1: Restore the Database Using phpMyAdmin
- Log in to Your Hosting Account
Access the cPanel or equivalent control panel provided by your host. Navigate to Databases and click on phpMyAdmin.


- Import the Backup Database
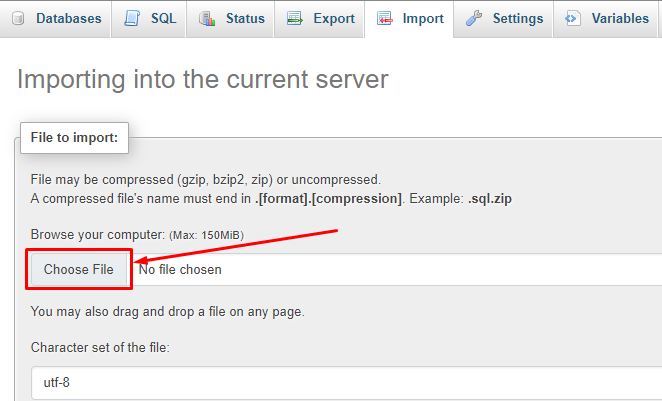
In phpMyAdmin, select the database associated with your WordPress site. Click on the Import tab. Choose the SQL backup file from your computer and click Go to import it. Wait for the process to complete.
You should see a success message once the database is restored.

Step 2: Restore WordPress Files Using FTP
- Connect to Your Site via FTP
Use an FTP client like FileZilla. Enter your FTP credentials (host, username, password) to connect to your server.
- Upload the Backup Files
In FileZilla, navigate to the root directory of your website (public_html). Delete any corrupted or outdated files if necessary. Upload the backup files from your computer to the server by dragging them from the local site (left panel) to the remote site (right panel).


- Verify Your Site
Once all files are uploaded, visit your site to ensure everything is functioning correctly. Log in to the WordPress dashboard and check for any issues with plugins or themes. Reactivate them as necessary.
After restoration, change your WordPress passwords and consider enhancing your site’s security with plugins or a firewall.
Checking Server Error Logs
Server error logs are files that record all the errors that occur on your web server. If a WordPress update broke your site, the error logs can provide clues about what caused the issue.
Error logs typically capture data like the date and time of the error, the nature of the error, and sometimes, details about the request that triggered the error. They are usually plain text files that can be opened with any text editor.
How to Access and Read Server Error Logs
- Via Hosting Control Panel: Most hosting providers offer easy access to error logs through their control panels like cPanel. You can usually find the error logs in the “Logs” section of your control panel.
- Using FTP: You can also access logs via FTP by navigating to the appropriate directory, typically within the /logs/ or /var/log/ folder on your server.
- Using Command Line: If you’re comfortable with command line tools, you can use commands like tail or grep to view logs directly on the server.
How to Identify and Fix Issues Based on Log Data
Look for patterns or recurring errors in the log file. For example, if you see a lot of “500 Internal Server Error” entries after a WordPress update, this could indicate a compatibility issue with a plugin or theme.
Use the timestamp to correlate when the error happened with any recent changes you made on the site, such as updates, installations, or changes to server settings.
Using WP-CLI for Troubleshooting

WP-CLI stands for WordPress Command Line Interface. It’s a great tool that allows you to manage your WordPress website using command lines instead of the usual web-based admin dashboard. If an update broke your WordPress site to the point of being inoperable, WP-CLI works exceptionally well to get it up and running.
This tool is particularly useful when you need to perform bulk actions or when your site is inaccessible due to issues like a failed update. WP-CLI can handle tasks such as installing and updating plugins, managing themes, and even resetting your site.
Wrapping Up After Fixing Your Website
You’re almost done! You’ve tackled the main issues and things are looking good, but there are still a few final tasks to complete before you can call it finished.
Test the Frontend of Your Site
After repairing your WordPress site, it’s important to test the front end to ensure everything is functioning as expected.
Start by loading the homepage. Make sure it appears correctly, without missing images, broken design elements, or layout issues. It’s important to test this across multiple browsers and devices to catch any inconsistencies. Slow loading or broken sections are red flags that need immediate attention.
Next, test the navigation of your site. Click through all the menus, internal links, and footers to ensure that nothing leads to a broken page.
Once the navigation is confirmed, it’s time to check any contact forms. Submit a test form to see if it works correctly. Make sure you receive both a confirmation message and an email, and that the form data reaches the admin side without any issues.
For sites with e-commerce functionality, testing the purchase process is critical. Add items to the cart, proceed to checkout, and ensure the payment gateways are working. Make sure confirmation emails are being sent to customers.
Any issues here can directly impact sales, so take your time testing this thoroughly.
Test the Backend of Your Site
Once you’re done checking the frontend, it’s time to ensure the backend of your site is working properly. Start by logging into the WordPress admin dashboard. Make sure it loads quickly and without any errors.
Next, test the functionality of your plugins. Go through each one, especially important ones like SEO, caching, and security plugins. Ensure they’re working correctly. If any problems pop up, try disabling and re-enabling the plugin or updating it to the latest version.
After that, review your theme and customizations. Check any custom headers, footers, or widget placements to see if they display as expected on the frontend. Also, ensure any custom CSS is applied correctly.
You should also test creating and updating content. Create a new post or page to confirm everything is working as it should. Upload some images or media files to verify if they display correctly on the front end.
Lastly, don’t forget to check user roles and permissions. Switch between different accounts like admin and editor to make sure each role can perform the actions it should. If you use custom roles or plugins to manage permissions, test those too to confirm nothing was affected during the repair process.
How to Prevent Updates From Breaking A WordPress Site
Prevention is still the best strategy for maintaining a smooth sailing website. While errors and broken websites can happen every now and then, you can still proactively minimize these situations from occurring.
Here are some best practices to help protect your website from unwanted issues.
Set Up Regular Backups
We’ve discussed many times in this blog the importance of using backups when something goes wrong with your site. By now, you should understand how crucial regular website backups are.
Here’s how you can set up automatic backups:
- Using WordPress Plugins: One of the easiest ways to back up your site is by using a plugin. Popular options include UpdraftPlus (which has a free starter plan) and Jetpack Backups.
- Through Your Hosting Provider: Many hosting providers, like GreenGeeks, offer backup services. It’s smart to have multiple backups stored in different locations or data centers for extra security.
- Using Cloud Backup Services: You can also use cloud backup services like Sucuri’s Backup-as-a-Service (BaaS) to keep your site data safe.
Staging Environment
A staging environment is essentially a private copy of your live website where you can safely test changes, updates, or new features before applying them to your actual site.
This eliminates the risk of your website breaking by allowing you to test updates and new features in a controlled setting. If an update broke your WordPress site in staging, it’s easy to fix without any impact on your live site, making the process of WordPress website repair much smoother.
Plugin and Theme Management
WordPress updates its core regularly, introducing new features or changes that could cause conflicts with outdated plugins or themes. Updating everything ensures your site remains functional and compatible with the latest WordPress version.
Before installing a WordPress plugin, check the date of its last update and read reviews. Plugins that are regularly updated and well-reviewed are safer and more reliable. For plugins that are less critical to your site’s performance, consider enabling automatic updates to keep them current without needing manual intervention.
Using a Child Theme
A child theme in WordPress is a theme that inherits the design, style, and functionality of another theme, known as the parent theme. The key benefit of a child theme is that it allows you to customize your website without altering the parent theme’s core files.
When WordPress updates a theme (or you manually update the theme), the core files of the parent theme get overwritten. If you’ve made custom changes directly to the parent theme, those changes will be lost after an update.
A child theme prevents this by allowing you to make your changes in a separate file structure, so the parent theme can update freely without affecting your customizations. This way, if a WordPress update breaks your site, you can avoid costly WordPress website repair efforts.
Frequently Asked Questions (FAQs)
The first step is to identify the issue by checking for problems with plugins, themes, or the database. You might want to disable all plugins and switch to a default theme to see if that resolves the issue.
You can use FTP or your hosting control panel (like cPanel) to access your site’s files.
Yes, you can troubleshoot by disabling plugins, switching themes, or using WP-CLI to fix the issue. However, having a backup is always a safer and faster way to restore your site.
Yes, but it should be done cautiously. You can roll back to an earlier version by downloading the older WordPress files and uploading them to your server.
Always test updates in a staging environment before applying them to your live site. Keep all your themes and plugins updated, and make regular backups of your site.
If an update breaks your custom theme, try switching to a default theme to see if the issue resolves. If it does, you’ll need to check the custom code in your theme for compatibility with the new WordPress version.
If you’re unable to fix the issue, consider contacting your hosting provider for support, or hire a professional WordPress developer to help troubleshoot and resolve the problem.
WordPress Update Broke My Site: What’s Next?
Fixing your WordPress site after an update broke it requires a few important steps. We’ve outlined everything you need to do in this article so you can easily follow them.
But then again, prevention is still better than cure. So it’s very important to follow the best practices in managing your website to avoid further complications along the way.
By being proactive and careful with updates, you can prevent most issues before they happen. And with the right tools, you can confidently manage your WordPress site and keep it in great shape.


