Build a Bootstrap light/dark toggle switch component
Bootstrap, in the current latest version, v5.3.0, has started supporting color modes. This means that in your Bootstrap layouts you can choose from its default light or dark mode, or even create a new one.
In the Bootstrap docs, they have implemented a dropdown color mode toggle that can work as a starting point for anyone who wants something similar. But there’s no actual switcher component included in Bootstrap.


What if we want to build our own custom color mode switcher while respecting Bootstrap’s built-in dark mode styles? This is absolutely possible. Recently, we built a theme switcher, so let’s make it work with Bootstrap.
What we built in the past
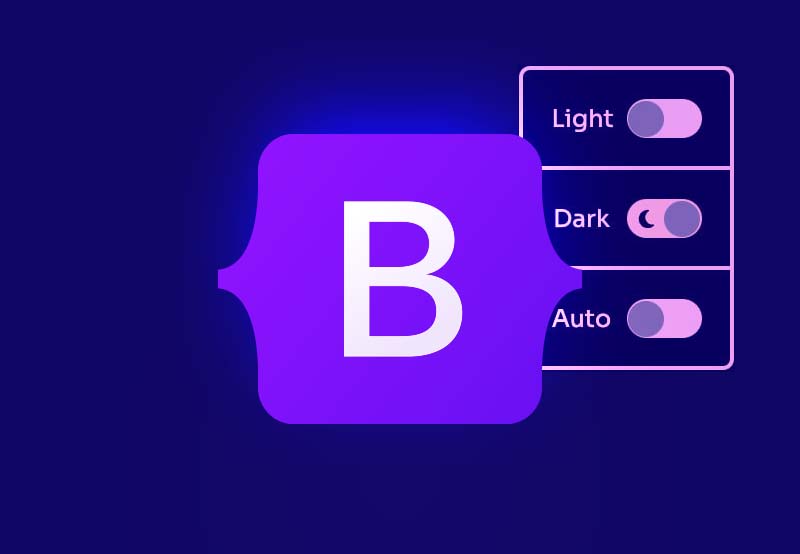
As a reminder, here’s the light/dark toggle switch component that we built in the previous tutorial:
Bootstrap color mode switcher
To turn it into a Bootstrap-based toggle, we’ll make the following modifications:
- First, we’ll apply the dark mode using the
data-bs-theme="dark"HTML attribute instead of thetheme-darkclass.


- Next, we’ll remove all our dark mode CSS variables as Bootstrap has built-in dark mode styles.
1 |
/*No need for them*/
|
2 |
|
3 |
:root { |
4 |
--white: #fff; |
5 |
--black: black; |
6 |
--text-color: var(--black); |
7 |
--bg-color: var(--white); |
8 |
}
|
9 |
|
10 |
.theme-dark { |
11 |
color-scheme: dark; |
12 |
--text-color: var(--white); |
13 |
--bg-color: var(--black); |
14 |
}
|
- Finally, to avoid conflicts with the previous demo, we’ll add the
bsprefix before all our local storage items. For example, we’ll replace thedark-modekey with thebs-dark-modeone.
Updated JavaScript
Here’s the new required JavaScript code:
1 |
const html = document.documentElement; |
2 |
const switches = document.querySelector(".switches"); |
3 |
const inputs = switches.querySelectorAll("input"); |
4 |
|
5 |
if (localStorage.getItem("bs-dark-mode")) { |
6 |
html.setAttribute("data-bs-theme", "dark"); |
7 |
}
|
8 |
|
9 |
if (localStorage.getItem("bs-selected-radio")) { |
10 |
switches.querySelector( |
11 |
`#${localStorage.getItem("bs-selected-radio")}` |
12 |
).checked = "true"; |
13 |
}
|
14 |
|
15 |
const setTheme = (theme) => { |
16 |
if (theme === "dark") { |
17 |
html.setAttribute("data-bs-theme", "dark"); |
18 |
localStorage.setItem("bs-dark-mode", "true"); |
19 |
} else { |
20 |
html.removeAttribute("data-bs-theme"); |
21 |
localStorage.removeItem("bs-dark-mode"); |
22 |
}
|
23 |
};
|
24 |
|
25 |
const handleMediaChange = (e) => { |
26 |
if (switches.querySelector('[type="radio"]:checked').id === "auto") { |
27 |
setTheme(e.matches ? "dark" : "light"); |
28 |
}
|
29 |
};
|
30 |
|
31 |
const handleInputChange = (e) => { |
32 |
const themeMode = e.target.id; |
33 |
if ( |
34 |
themeMode === "dark" || |
35 |
(themeMode === "auto" && |
36 |
window.matchMedia("(prefers-color-scheme: dark)").matches) |
37 |
) { |
38 |
setTheme("dark"); |
39 |
} else { |
40 |
setTheme("light"); |
41 |
}
|
42 |
localStorage.setItem("bs-selected-radio", themeMode); |
43 |
};
|
44 |
|
45 |
window
|
46 |
.matchMedia("(prefers-color-scheme: dark)") |
47 |
.addEventListener("change", handleMediaChange); |
48 |
|
49 |
inputs.forEach((input) => input.addEventListener("input", handleInputChange)); |
And the resulting demo:
Override Bootstrap’s dark mode variables
The Bootstrap built-in dark mode is great, but it would be nicer if we knew how to customize these styles.
For this demonstration, I created a new Bootstrap project on GitHub. This time, I installed and included it via npm. Also, I used the Prepros app for easier compilation of Sass files.
As another reminder, a few years ago, I went through how to customize Bootstrap’s Sass files. The concept remains the same.
By default, Bootstrap stores all its dark mode-specific Sass variables in the _variables-dark.scss file.


In our case, let’s customize the default foreground and background page colors that Bootstrap uses in dark mode. To do so, we’ll navigate to our custom main.scss Sass file, target the associated variables, and modify their values, like this:


This results in an appearance like this one:


We can also use Bootstrap’s color-mode mixin to apply additional styles in dark mode like this:
1 |
@include color-mode(dark) { |
2 |
body { |
3 |
border: 1px solid red; |
4 |
}
|
5 |
}
|
This outputs to:
1 |
[data-bs-theme=dark] body { |
2 |
border: 1px solid red; |
3 |
}
|
Conclusion
That’s all, folks! Shortly, Bootstrap might provide an official toggle switch component for overriding color schemes. But for now, you can take advantage of the one we built here!
As always, thanks a lot for reading!


